M3 Perfect Review
Written by Brakken
January 2005
Introduction
Welcome to my review of the M3 Perfect a Media Player, Backup and Development System for both
the Nintendo DS (NDS) and/or GameBoy Advance (GBA) hand held video game systems. Like other
comparable solutions this device uses removable media and doesn't limit you to using expensive
proprietary flashcards which feature far less storage capacity. The M3 Perfect comes in two
flavors ' one that uses Compact Flash (CF) and the other that uses Secure Digital (SD) flash
cards. Both versions support up to 2 Gigabytes of data and with some tricky formatting 4 Gigabytes!
Possibly in later BIOS versions we'll see support for larger cards.
The M3, like its counterpart the G6 Flash is a very stable and reliable product built around a
custom media operating system that other companies have cloned. Due to the fact that the M3
Perfect has a licensed copy of the Media Player Shell they have been able to seamlessly integrate
into the M3 Perfect delivering a 'perfect' solution for using the device.
Features
  Boot NDS Homebrew/Backups Boot NDS Homebrew/Backups
Boot GBA Homebrew/Backups
Movie & Music Player
Picture Viewer
EBook Reader
Packaging
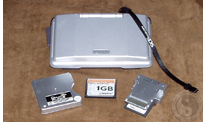
The M3 Perfect package comes inside bubble wrap and includes the Main Unit and PassKey devices.
Unless you order media with the unit it does not come with any so you will need to pickup either
a CF or SD card before you'll be able to use your M3. Yes, I tried to turn the unit on without
any media in it and the M3 asked me if I would like to continue even though there was no media
it in, but when I picked yes the result was only a black screen.
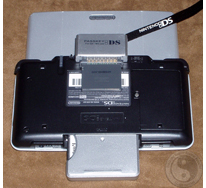
Installation - Hardware
 After I put in my 1GB CF card the system booted fine and I was presented with the normal media
player menu that came with the G6 unit, but it had been updated with some better graphics. One
thing that caught my eye was the fact that only one of the screens was powered on! The M3 Perfect
is the first unit I've reviewed that doesn't leave both screens on all of the time which of course
drains your Nintendo DS's battery quicker. Once I made sure the unit was booting I went to search
for the software to actually use the device. After I put in my 1GB CF card the system booted fine and I was presented with the normal media
player menu that came with the G6 unit, but it had been updated with some better graphics. One
thing that caught my eye was the fact that only one of the screens was powered on! The M3 Perfect
is the first unit I've reviewed that doesn't leave both screens on all of the time which of course
drains your Nintendo DS's battery quicker. Once I made sure the unit was booting I went to search
for the software to actually use the device.
Installation ' Game Manager Software
I hit up M3's website and downloaded the latest English BIOS, Media Converter, Game Manger and the
custom version of MoonShell for the device. I mentioned English, correct? There are actually many
versions of the BIOS and Media Converters that come in other languages such as Chinese and Japanese.
I wasn't required to download a specific version of the Game Manager as it has a built in Language
selection option.
I installed the Game Manger Software, plugged in my Compact Flash card into my PC's Card Reader
(without one of these you will be unable to read/write to your media) and ran the software. Once
it's loaded it will ask you if you are using a Secure Digital or Compact Flash card so I picked
the one I was using and then it brought up the main interface.
 The Game Manager is laid out pretty well and is really easy to use. You've got your computers
folder (directory) structure listed on the left, the current installed images in the middle
and the menu on the right. The Manager starts off in English mode, but you can pick Chinese,
Japanese or Korean from the Language pull-down menu. Other then the Language selection you've
got a Write NDS, Write GBA, Delete, Help and Quit options. The Game Manager is laid out pretty well and is really easy to use. You've got your computers
folder (directory) structure listed on the left, the current installed images in the middle
and the menu on the right. The Manager starts off in English mode, but you can pick Chinese,
Japanese or Korean from the Language pull-down menu. Other then the Language selection you've
got a Write NDS, Write GBA, Delete, Help and Quit options.
I proceeded to put some Nintendo DS images on the card by clicking the Write NDS option. I
selected a few clean backups and then was presented with an option menu to control how the
images would be converted. The options are to Trim the image, Fast Boot, Normal or Direct
Copy, DMA speed (1x/4x) and it also will let you save the settings for all of the images you
wish to convert (for batch converting).
 The Trim option is great as it will trim off any garbage data at the end of your image which
will save you space. Fast Boot does like it says; if you select this your image will be booted
almost instantly. Normal mode will load the entire image which takes a bit longer and Direct
Copy will put the clean image right on the card. Regardless if you're going to keep your clean
images intact you'll still have to use the Game Manager software so it can create a Save Data (SRAM) file for it as without one of these you will be unable to save your
progress, settings, etc in the image you will run. The Trim option is great as it will trim off any garbage data at the end of your image which
will save you space. Fast Boot does like it says; if you select this your image will be booted
almost instantly. Normal mode will load the entire image which takes a bit longer and Direct
Copy will put the clean image right on the card. Regardless if you're going to keep your clean
images intact you'll still have to use the Game Manager software so it can create a Save Data (SRAM) file for it as without one of these you will be unable to save your
progress, settings, etc in the image you will run.
Another neat option was the ability to put the NDS images in any place on the card you want
as it will still be able to read the SRAM from the \NDSSAVE\ directory. Additionally, each
game save takes up 263,168 bytes which is more then plenty for the images that use 2m of SRAM.
 Now I set off to convert some GBA images and was presented with a different conversion options
menu after I picked a few to convert. This time I was presented with the Real Time Save,
SoftPatch, Hareware1/2 patch and IPS options. The Real Time Save will let you save your game
at any time. The Soft and Hardware patches will attempt to patch your images to be able to
boot (you might have to try them all before some images will work). Now I set off to convert some GBA images and was presented with a different conversion options
menu after I picked a few to convert. This time I was presented with the Real Time Save,
SoftPatch, Hareware1/2 patch and IPS options. The Real Time Save will let you save your game
at any time. The Soft and Hardware patches will attempt to patch your images to be able to
boot (you might have to try them all before some images will work).
The IPS patch option is great as you'll be able to use Trainers, Game Fixes or any other
type of IPS patch without having to first apply them to your GBA images. IPS files are patches
that you can add to your images that will change the game, let you cheat and/or access hidden
things in the game.
Just like the NDS images you can put the GBA ones in any directory you wish and its SRAM data
is written to \GAMESAVE\ and each one takes up 1,048,578 bytes. You might be wondering 'why'
the Game Manager software creates such large SRAM files for both types of images. It does
this so you can have multiple saves per image! This is really good if multiple people will
be using the unit!
Usage - General
 As I wanted to make sure this review was as accurate as possible I first had to update the
BIOS. So I put the one I downloaded from M3's webpage in the root of the card (the main card '
not in any directories) and then put the CF card into the M3 and booted it. Oh, of course I had
put the PassKey in the NDS slot along with an original game in it before I booted the Nintendo DS. As I wanted to make sure this review was as accurate as possible I first had to update the
BIOS. So I put the one I downloaded from M3's webpage in the root of the card (the main card '
not in any directories) and then put the CF card into the M3 and booted it. Oh, of course I had
put the PassKey in the NDS slot along with an original game in it before I booted the Nintendo DS.
After it booted I was greeted with a 'Would you like to upgrade' screen and I pressed the 'start
button' and it went to work. If I wanted to I could of press 'A' to cancel, but I didn't need to
do that. When it finished I turned the NDS off and then back on again and it asked me to upgrade
again! So this time I pressed 'A' and was back to the menu screen.
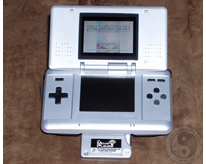
The menu screen is simple enough and has icons you can select to watch Movies, listen to Music,
look at Pictures, Play a Game, Read an EBook or go to the Setup Menu. There was also some text at
the bottom of the screen telling me I could press 'START' to boot into GBA mode, but I decided to
check out the Setup Menu first.
In the Setup Menu you can pick the Music Playback type (all, repeat all, repeat one, single,
random and repeat), tell the M3 to shutdown the NDS using the Sleep mode (5, 10, 15, 20, 30,
40, 50, 60 minute durations), have the EBook/Image Reader/Viewer automatically switch pages/image
in 1-30 intervals and it will also let you select a custom 'theme' for the entire Menu System!
Usage ' Nintendo Games & Homebrew
 The very first thing I noticed is when I picked the 'Games' icon was that it displayed the files
and directories using long filenames! I was still impressed even though the text was a bit large
and didn't list enough files on the screen. So I selected a game (I used the Fast Boot conversion
option) and after a small pause the game loaded! I messed around in the game a bit until I came to
a save point and then saved and shut the console off. The very first thing I noticed is when I picked the 'Games' icon was that it displayed the files
and directories using long filenames! I was still impressed even though the text was a bit large
and didn't list enough files on the screen. So I selected a game (I used the Fast Boot conversion
option) and after a small pause the game loaded! I messed around in the game a bit until I came to
a save point and then saved and shut the console off.
Next I turned the Nintendo DS back on and the M3 Menu came up saying it was now backing up the
SRAM for the game I had just booted. It did disappoint me that you had to turn the console back
on for it to backup the data, but it wasn't really that big of a deal.
Now it was time to try out some Homebrew, but when I tried to load one it said 'NO' SRAM data
could be found and asked if I wanted to still boot it. As the Homebrew I was booting didn't
require any SRAM I went ahead and booted it. Worked great! I guess if I wanted to boot some
homebrew that needed SRAM I would have to remember to use the Game Manger to put the image on
the Compact Flash card.
I now decided to mess around and move the SRAM for the Nintendo DS image I played out of the
\NDSSAVE\ directory and tried to boot it again, but it said it could not boot the game due to
the lack of SRAM. So it's okay to boot homebrew without having a SRAM file present, but not a
backup. So I put the SRAM back on the Compact Flash card and went to boot the game.
Now I was presented with the option to load a SRAM file of my choice, but there was only one
(the one I just copied over) to choose from. Wanting to know how to make multiple saves I copied
the original SRAM file and then renamed it to something else. That did it! When I tried to boot
the game up I could now switch between the two SRAM files.
So I played it a bit more and then shut off the console and turned it back on and now it asked
me which SRAM file to save it too. The funny part was it listed not only the two SRAM files for
the game I had been playing, but also listed the SRAM for every other SRAM file on my Compact
Flash card.
As I had now gotten the hang of booting images I decided to give the M3 the mother of all
tests ' I booted up a game that streamed video in it and unfortunately the video was choppy.
It seems that the M3 cannot read fast enough from the Compact Flash card, but I'm not sure
about the SD card. I played around with it some more and didn't notice any slowdown during
loading times or game play, but only during video playback from within Nintendo DS games.
Usage ' GameBoy Advance
 Next it was time to test some good old GameBoy Advance games. I was expecting slowdown as some
other products I've reviewed for the GBA have slowdown issues, but after pressing 'start' at
the main menu, picking my game and playing it for several hours I didn't run into one bit of
slowdown. So I tried a few more 'known' games that have slowdown in them and they worked 100%!
I'm glad to report that the M3, even when the games are patched with Real Time Save (RTS) have
ZERO slowdown! Next it was time to test some good old GameBoy Advance games. I was expecting slowdown as some
other products I've reviewed for the GBA have slowdown issues, but after pressing 'start' at
the main menu, picking my game and playing it for several hours I didn't run into one bit of
slowdown. So I tried a few more 'known' games that have slowdown in them and they worked 100%!
I'm glad to report that the M3, even when the games are patched with Real Time Save (RTS) have
ZERO slowdown!
I did however run into a couple of games that would not run, but after unchecking the RTS they
worked fine. Luckily, I didn't run into any games that needed the patching messed with, but
I'm sure they are out there otherwise it would not be an option in the Game Manger. Lastly, I
applied a few Trainers (cheat files) in the IPS format and they worked great.
 At this point in time my Nintendo's DS battery was about dead and I had to get some rest. So
I removed the PassKey and M3 Perfect from the unit and put it on the charger. The next day
when I awoke I put everything back together and turned to Nintendo DS on and to my surprise
it started to backup the SRAM from the last game I played! I was amazed as other products I
reviewed require you to quickly reboot the Nintendo DS for them to be able to backup the data,
but not the M3! At this point in time my Nintendo's DS battery was about dead and I had to get some rest. So
I removed the PassKey and M3 Perfect from the unit and put it on the charger. The next day
when I awoke I put everything back together and turned to Nintendo DS on and to my surprise
it started to backup the SRAM from the last game I played! I was amazed as other products I
reviewed require you to quickly reboot the Nintendo DS for them to be able to backup the data,
but not the M3!
So, I continued my game playing for the next day or so and didn't run into any glitches,
slowdown or any trouble at all. I got the gaming part down so now it's time to move on with
the review. Oh, one last thing! I tried using the M3 Perfect using the FlashME BIOS with the PassKey removed and it still loads and plays NDS/GBA files just fine!
Installation - Media Software
 To test out the M3's media playback I had to install it's software and according to the
Guide they link to from their page this involved several steps including updating to the
latest version of DirectX, installing some Mega Codec pack and removing a certain file from
my system. I thought this was a bit excessive and decided to skip this, but after converting
some movies and music and running them I decided I did need to go through the process linked
from their page as the quality of the media was pure garbage. To test out the M3's media playback I had to install it's software and according to the
Guide they link to from their page this involved several steps including updating to the
latest version of DirectX, installing some Mega Codec pack and removing a certain file from
my system. I thought this was a bit excessive and decided to skip this, but after converting
some movies and music and running them I decided I did need to go through the process linked
from their page as the quality of the media was pure garbage.
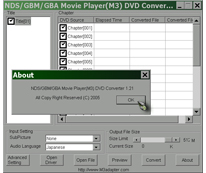 So I followed the guide to the dot and started over fresh. First I decided I would convert a
DVD movie using the DVD Converter Beta software. I found my imported copy of Final Fantasy '
Advent Children and put it into my DVD drive. The software will allow you to convert the DVD
directly from the drive or from VOB files on your computer and gives you complete control over
which captures to include. So I followed the guide to the dot and started over fresh. First I decided I would convert a
DVD movie using the DVD Converter Beta software. I found my imported copy of Final Fantasy '
Advent Children and put it into my DVD drive. The software will allow you to convert the DVD
directly from the drive or from VOB files on your computer and gives you complete control over
which captures to include.
 I set it to convert the movie which was 2,930,523,920 bytes at the highest quality setting
possible and ended up with 854,376,448 byte directory of files. I copied the directory over
to the Compact Flash card and went to watch it. I was actually surprised at the quality of
the movie and the sound. The only thing that I noticed was in very fast sequences (such as
the bike/sword fight) that it got a little choppy, but other then that the movie was fully
watchable. Not that I'm a fan of watching movies on such a small screen, but if I had to I
wouldn't mind watching it using the M3. I would also like to note that the file size setting
in the DVD Converter software doesn't apply as it splits the movie up into separate files. I set it to convert the movie which was 2,930,523,920 bytes at the highest quality setting
possible and ended up with 854,376,448 byte directory of files. I copied the directory over
to the Compact Flash card and went to watch it. I was actually surprised at the quality of
the movie and the sound. The only thing that I noticed was in very fast sequences (such as
the bike/sword fight) that it got a little choppy, but other then that the movie was fully
watchable. Not that I'm a fan of watching movies on such a small screen, but if I had to I
wouldn't mind watching it using the M3. I would also like to note that the file size setting
in the DVD Converter software doesn't apply as it splits the movie up into separate files.
 Next I loaded up the Image software and converted some images I had taken of my computer along
with some family photos. The software allowed me to convert the images into grayscale, 256 colors,
GBA TrueColor and normal TrueColor. I converted all of the images into each format and then gave
them a look over. They actually looked better then I expected. I couldn't really tell too much of
a difference between the 256 and TrueColor photos, but this is most likely due to the size of the
screen. Next I loaded up the Image software and converted some images I had taken of my computer along
with some family photos. The software allowed me to convert the images into grayscale, 256 colors,
GBA TrueColor and normal TrueColor. I converted all of the images into each format and then gave
them a look over. They actually looked better then I expected. I couldn't really tell too much of
a difference between the 256 and TrueColor photos, but this is most likely due to the size of the
screen.
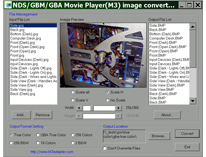
Next it was time to check out the normal Movie Converter software which comes in two versions:
the Movie Converter and the Movie Converter Wizard. As I was pretty confident I used the normal
converter. My test subject was Coolio's Gangster Paradise music video.
| Coolio Gangster's Paradise (41.3Mb) |
| Low |
15min |
5MB |
Horrible |
| Mid |
4min |
10.5MB |
Noisy |
| High |
7.5min |
22MB |
Fine |
| Super |
8.3min |
24MB |
Best |
After having sub-par results with Coolio's video I decided to convert some other music videos
that had been encoded with the MPEG2, AVI, DiVX and XViD codec's, but the results were around
the same as my original tests. So I then proceeded to convert all of these media formats into
VOB (DVD Video) and used the DVD Converter on them and they turned out perfect! I thought it
could have been the computer I was using, so I tried two others, both of which that had
different Operating Systems, but got the same results.
I thought I would have better luck using the Music Converter and decided to convert a few MP3's
one of which was by 'Nu-NRG' called 'Live at Orgasmatron' (86.2Mb). It actually converted the
entire song, but the results were still below par. Using the Music Converter you can convert
your songs into either 8bit Stereo or 16/32/64bit Mono and I would have to say if you're going
to use the M3's built in music player to use the 64bit Mono as this produces the best results.
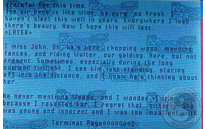
Usage - EBook Reader
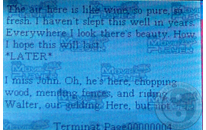 I copied over some plain text files (the Terminator 2 Sequels) to the card and loaded them with
the reader. Now the large font was really bothering me, but after pressing select I was in for
a big surprise as I could change the font itself along with selecting a new size! I could change
between System, Central European, Cyrillic, West European, Greek, Turkish, Hebrew, Baltic and
Vietnam fonts! So I picked Central European and set the font size to 8x8 and set off reading. I copied over some plain text files (the Terminator 2 Sequels) to the card and loaded them with
the reader. Now the large font was really bothering me, but after pressing select I was in for
a big surprise as I could change the font itself along with selecting a new size! I could change
between System, Central European, Cyrillic, West European, Greek, Turkish, Hebrew, Baltic and
Vietnam fonts! So I picked Central European and set the font size to 8x8 and set off reading.
The reader is easy to control as all you need to do is to press UP/DOWN to scroll per line or
LEFT/RIGHT/A/B to skip pages. Additionally, if you hold down A/B it will start to skip pages
in multiples of 10. Once I found the place I had left off in the book I have been reading for
a while on another unit I pressed 'start' and I could actually bookmark my location!
 The Public Relations Representative for both the M3 and G6 products I have been dealing with has
kept telling me they own the rights and code for the Media Player itself and after seeing it
integrated into the M3 and it actually supporting bookmarks leads me to believe that the other
devices I have reviewed that use the Media Player as an external plug-in have indeed ripped it
off. The Public Relations Representative for both the M3 and G6 products I have been dealing with has
kept telling me they own the rights and code for the Media Player itself and after seeing it
integrated into the M3 and it actually supporting bookmarks leads me to believe that the other
devices I have reviewed that use the Media Player as an external plug-in have indeed ripped it
off.
Next I pressed start, bookmarked my location and restarted the Nintendo DS. The bookmark worked
fine, but what I noticed more was the fact that the entire Media Player now uses the font along
with the size I set it at! No more large filenames! Boy, was I a happy camper!
Usage ' MoonShell
 I would have to say without having a custom ported version of the MoonShell audio/video player
made for the M3 I would have been left converting my media to VOB then to the format the M3's
BIOS could read. I'm happy that MoonShell was available as it can play MP3 music directly
(without having to convert it) and also view BMP files. So I put some MP3 and BMP files on
the Compact Flash card and of course MoonShell did its job. The only complaint I have about
MoonShell is that even on the loudest audio setting it's a bit hard to hear in a noisy
environment whereas the M3's BIOS cranks out some serious sound. I would have to say without having a custom ported version of the MoonShell audio/video player
made for the M3 I would have been left converting my media to VOB then to the format the M3's
BIOS could read. I'm happy that MoonShell was available as it can play MP3 music directly
(without having to convert it) and also view BMP files. So I put some MP3 and BMP files on
the Compact Flash card and of course MoonShell did its job. The only complaint I have about
MoonShell is that even on the loudest audio setting it's a bit hard to hear in a noisy
environment whereas the M3's BIOS cranks out some serious sound.
Custom Themes
One thing I really dig is the ability to use and/or create your own custom themes for the M3's
BIOS. The M3 webpage links to a Theme Creator which includes and example theme. The theme itself
is based on 24bit Windows Bitmap files (BMP) and can easily be changed using the graphic editor
of your choice. Just for this review I've created a custom background (linked below) that you
can use to show you just how easy it is to make one! Sadly, it only works in Nintendo DS mode.

More Tests
 As the unit was originally designed for the GameBoy Advance only I decided to give it a test
using the GameBoy SP and original Game Boy Advanced units. I'm happy to report that everything
worked out fine. I also tested it in a brand new Blue Nintendo DS, but due to the fact that
the Blue DS isn't compatible with the PassKey v1.0 I was unable to test Nintendo DS images.
GBA images still ran fine along with all of the other BIOS features. As the unit was originally designed for the GameBoy Advance only I decided to give it a test
using the GameBoy SP and original Game Boy Advanced units. I'm happy to report that everything
worked out fine. I also tested it in a brand new Blue Nintendo DS, but due to the fact that
the Blue DS isn't compatible with the PassKey v1.0 I was unable to test Nintendo DS images.
GBA images still ran fine along with all of the other BIOS features.
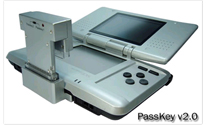 Luckily, the issue with the newer Nintendo DS systems has been resolved and the M3 Team will
be releasing a PassKey v2.0 in the near future. So if you're thinking about purchasing a M3
and have a newer NDS you won't have to worry about it not being supported. Luckily, the issue with the newer Nintendo DS systems has been resolved and the M3 Team will
be releasing a PassKey v2.0 in the near future. So if you're thinking about purchasing a M3
and have a newer NDS you won't have to worry about it not being supported.
Suggestions
 The Game Manager Directory Issue The Game Manager Directory Issue
It would be great if the Game Manager would remember the last directory you were working in
when you restart it as having to navigate your way back to the directory is a bit annoying.
Hide the SRAM Directories
If the \NDSSAVE\ and \GBASAVE\ directories were not shown when using the M3's directory
browser it would cut down on two unneeded entries and they get in the way when trying to
browse.
Upgrade Check Bypass
I believe once you've upgraded your BIOS to the latest version if that version still
resides on the card then the M3 would not ask you to upgrade to the same version that
is already on the card. This way you would not have to remove the update from the card
to get rid of the 'Do you want to upgrade' prompt.
Automatic SRAM Slots
Lastly, it would be cool if the M3 would let you automatically select different SRAM
slots to save/load from just like the G6 does. It would just make it easier to manage
your SRAM instead of having to manually create separate SRAM files.
Conclusion
This might tick off a few people, but in my opinion the M3 Perfect is the best Nintendo
DS/GBA solution currently on the market for Media Playing, Backup and Development purposes.
With its rich feature set, integrated customizable menu system, compatibility and storage
capacity it stands alone. Additionally, if you're only a GameBoy Advance user I would think
about purchasing a M3 Perfect as there is zero slowdown during game play and it supports
a bunch of cool features! Until someone releases something better I would get either the
Compact Flash or Secure Digital version of the M3 Perfect right away!
Negatives
 - NDS Game Streaming Video Lag - NDS Game Streaming Video Lag
- Built in Media Player Quality
- Unit Sticks out of the Nintendo DS
Positives
+ Mass Storage Solution
+ Intuitive User Interface
+ Battery Time
+ LCD off for GUI
+ LCD off During GBA Mode
+ Compatibility
+ Multiple SRAM Slots
+ SRAM Backup/Retention
+ Custom Themes for GUI
+ Supports FlashME
+ Custom MoonShell
|

